
What started as a tweet…
…became a project.
This project began as a simple question: why doesn’t Procreate support adjustment layers? What started as a tweet evolved into a deeper exploration of how creators manage non-destructive editing in professional workflows.

Project Overview
Procreate is widely used for sketching, inking, and painting—but breaks down during final image refinement. Professional artists often leave the app to perform color grading and tonal adjustments in tools like Photoshop or Affinity Photo.
This happens because adjustments in Procreate are destructive and tied to individual layers, forcing users into workarounds like duplicating layers or flattening work mid-process.
The result: disrupted creative flow, increased risk, and unnecessary friction in workflows that are often time-sensitive.
Key Impact
Preserved creative momentum by integrating adjustment layers directly into Procreate’s workflow, eliminating the need to switch tools, and removing the need for disruptive app switching to tools like Photoshop.
My Role
Solution Strategy
To support non-destructive editing while preserving Procreate’s performance and simplicity, the solution introduces adjustment layers as a lightweight, flexible system within the existing layer stack.
Adjustments live alongside standard layers and affect all layers beneath them, enabling global edits without permanently altering original artwork. Controls are designed to remain contextual and “fly open,” allowing quick iteration without interrupting the canvas experience.
Performance considerations were also addressed—users can temporarily reduce frame rate during previews, ensuring responsiveness while maintaining Procreate’s high-performance standards.
Results
This solution extends Procreate’s capabilities without compromising its core experience. By introducing non-destructive adjustment layers, artists can complete more of their workflow within a single tool reducing reliance on external software and minimizing disruptive workarounds.
More importantly, it preserves creative momentum. Artists can experiment freely, make iterative changes, and refine their work without risking permanent edits. Thus bringing Procreate closer to a complete, professional-grade workflow tool.

Research & Insights
To understand how professional artists manage non-destructive editing, I conducted interviews, comparative analysis, and task-based usability testing with illustrators who regularly move between Procreate and desktop tools.
The core issue wasn’t the absence of a specific feature it was workflow disruption.
Artists rely on adjustment layers as a global control system, expecting them to affect all layers beneath which is consistent with tools like Photoshop.
Performance is critical, but users are willing to accept temporary, intentional tradeoffs as long as they remain visible and controlled.
Hidden or gesture-based performance changes reduce confidence, especially during high-stakes moments like export.
Comparative Analysis
Photoshop and After Effects offer powerful non-destructive editing, but they lock users into steep subscriptions and complex workflows that feel like overkill for most illustrators. Affinity matches much of that capability at a one-time price, yet it still carries the weight of a desktop-first mindset. Procreate stands apart — it's the tool artists actually love using, the one that feels like drawing with your hand rather than operating software. What's been missing is a way to finesse color and tone without flattening your work or bailing out to another app. A Live Preview Toggle for non-destructive adjustments would close that gap, giving professional illustrators and comic artists the editorial control they need while preserving the fluid, 120fps experience that makes Procreate feel like magic on an iPad. The key is restraint: the feature has to be faster and more intuitive than Affinity's version, it can't compromise performance, and it must resist the gravitational pull of scope creep that would turn Procreate into the bloated tool artists came here to escape.
Affinity Map
After conducting a comparative analysis and interviews with illustrators, I synthesized findings through affinity mapping to surface recurring behavioral patterns.
Key Insights
Artists frequently leave Procreate to perform adjustments in tools like Photoshop breaking creative flow and introducing risk mid-process. When adjustments are made, users expect them to behave as global controls rather than being tied to individual layers.
This highlights a gap in Procreate’s workflow: users need a way to apply non-destructive changes without interrupting their process, while maintaining visibility and control over performance.
These insights directly informed the design of a lightweight, non-destructive adjustment system within Procreate.
How might Procreate enable non-destructive, global adjustments without compromising its signature 120fps performance or overwhelming its broad user base?
Personas
After conducting interviews and based on the key demographics summary we were able to create our User Personas to find our ideal candidate.


Feature Priorities
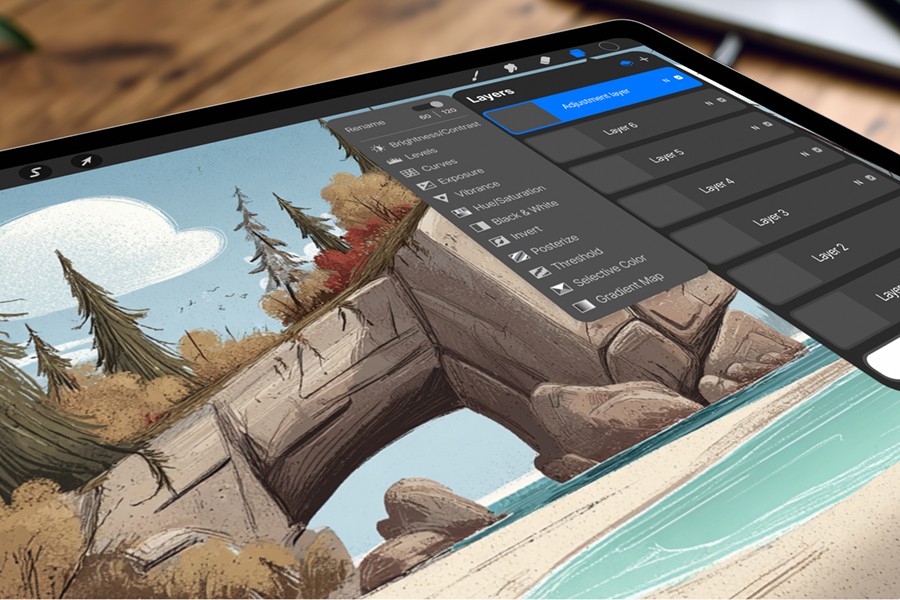
Adjustment Layers Entry Point — A dedicated button at the top of the layer stack, positioned next to the existing “+” action, allowing quick access to adjustment layers without changing mental models.
Core Adjustment Layers (3–4) — Initial support for the most commonly used adjustments (e.g., Hue/Saturation, Levels, Curves, Color Balance), focused on high impact with minimal complexity.
Expandable Adjustment Controls — Adjustment layers “fly open” to reveal controls directly within the layer stack, enabling quick iteration without navigating away from the canvas.
Performance Toggle — A toggle within the adjustment-layer menu allowing users to switch between 120 fps and a lower frame rate (e.g., 60 fps) during adjustment-heavy workflows, preserving responsiveness without permanently altering performance.
Expanded Adjustment Library — Additional adjustment types added incrementally as performance and usage patterns are validated.
Group & Mask Compatibility — Clear visualization of how adjustment layers affect groups and masked layers, supporting more complex compositions and professional workflows.
Adjustment Preview States — Visual indicators showing which layers or groups are affected, reducing confusion in complex files.
Flow Design & Task Simplification
The flow defines how adjustment layers integrate into Procreate’s layer system, allowing artists to apply non-destructive edits without disrupting their workflow. By gating performance intensive actions behind explicit user intent, the experience maintains responsiveness while giving users clear control reducing friction during both creation and final refinement.


Wireframes
I iterated on the design from early wireframes to final UI, refining layout, interactions, and hierarchy to better support how artists work. Each iteration focused on reducing friction, improving clarity, and keeping adjustments fast and unobtrusive within the creative flow.

User Testing Results
Usability testing with illustrators validated the core concept. All participants completed the adjustment layer task flow with a 100% success rate and responded positively to the idea of staying inside Procreate rather than exporting to another tool for basic edits. The emotional response was unanimously favorable: users were relieved they wouldn't have to break creative flow by jumping to Photoshop or Affinity just to tweak color and tone. However, testing also surfaced a clear friction point around the frame rate toggle.
All participants questioned why the 120fps-to-60fps toggle was hidden behind a swipe-left gesture on the adjustment layer itself. The hidden gesture felt unintuitive and disconnected from the context where users were already making decisions. Based on these findings, the highest-priority revision was relocating the frame rate toggle into the adjustment layer pop-out alongside a rename option, grouping related controls in a single, discoverable location.
A second revision introduced a disabled state on the "+" button while the frame rate toggle is active, preventing users from adding new layers during the preview and reinforcing the distinction between editing and painting modes.
The third revision added an export prompt when saving to PSD, giving users an explicit choice between exporting at full resolution with the adjustment layer visible or at standard resolution with it hidden.

